


How To Make Transparent Text In Photoshop.
Download and Install that font (or whatever is the closest match) and restart photoshop. Use the color picker to sample the color of the original text in your image (chances are it is not black). I would remove all of the existing text in the image and retype it with your new font and the changes you need to make.
Adobe Photoshop's Layer Styles are one of the quickest, yet most effective ways of achieving many different effects. This tutorial will show you how to combine the power of Layer Styles along with a couple of textures, brushes, and selection options to create a realistic-looking sand writing text effect.
Generator Categories Most Popular Animated Black Blue Brown Burning Button Casual Chrome Distressed Elegant Embossed Fire Fun Girly Glossy Glowing Gold Gradient Gray Green Heavy Holiday Ice Medieval Orange Outline Pink Plain Purple Red Rounded Science-Fiction Script Shadow Shiny Small Space Sparkle Stencil Stone Trippy Valentines White Yellow.
Do one of the following to select a type layer: Select the Move tool and double-click the type layer on the canvas. Select the Horizontal Type tool or the Vertical Type tool. Select the type layer in the Layers panel, or click in the text flow to automatically select a type layer. Position the.
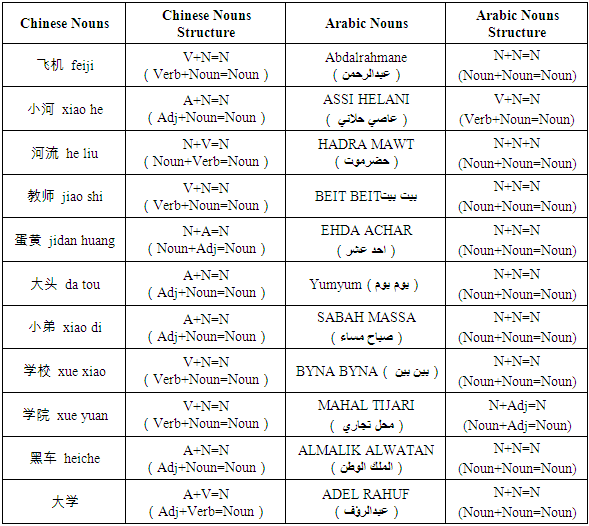
By default, non-Chinese, Japanese, or Korean versions of Photoshop hide options for Asian type that appear in the Character panel and Paragraph panel. To view and set options for working with Chinese, Japanese, and Korean type in these versions of Photoshop, you must select Show Asian Text Options in the Preferences dialog box. You can also control how font names are displayed—in English or.
In this tutorial, I'll show you step-by-step how to create a fire text effect in Photoshop, engulfing your letters in burning hot flames. We'll start by adding some initial text, and then we'll set the text on fire using Photoshop's Wind filter, the Liquify filter, adjustment layers and layer effects! We'll blend the text into the flames using the Brush Tool and a layer mask. And we'll enhance.
Now we will apply a layer style to add some dimension to the chrome letters. Note that the gloss contour is changed to get more of a chrome look. I also added a drop shadow. And the result. Variations. A variation with different curve settings. If you want, Colorize the image with a Color overlay style. The great thing about using adjustment layers and Layer styles, is that it’s non.

. City of publication: Publisher, date of publication..jpg)